> For the complete documentation index, see [llms.txt](https://docs.trafficmonitor.ai/llms.txt). Markdown versions of documentation pages are available by appending `.md` to page URLs; this page is available as [Markdown](https://docs.trafficmonitor.ai/getting-started.md).

# Getting Started

## Step 1: Get your Traffic Monitor

The traffic monitor requires the [Recommended Hardware](/build-your-own-device-diy/recommended-hardware.md) and [software installation](/software-installation.md) before you can begin capturing roadway data.

There are two ways to get started:

<table data-card-size="large" data-view="cards"><thead><tr><th></th><th></th><th></th><th data-hidden data-card-cover data-type="files"></th><th data-hidden data-card-target data-type="content-ref"></th></tr></thead><tbody><tr><td><strong>Build It!</strong>  </td><td>See our <a href="/pages/bCpWjdihegZYApPZoFDC">Build your own device (DIY)</a> guide. The software is open source and components are available retail.</td><td>Customize to your heart's content.</td><td><a href="/files/ZKm0OlesF6jVCQmt9QBP">/files/ZKm0OlesF6jVCQmt9QBP</a></td><td><a href="/pages/bCpWjdihegZYApPZoFDC">/pages/bCpWjdihegZYApPZoFDC</a></td></tr><tr><td><strong>Buy It!</strong></td><td>(<em>coming soon)</em></td><td>Purchase a pre-built traffic monitor or kit from the Roadway Biome Project.</td><td><a href="/files/bpG8fGPldxUEFeVcaf1x">/files/bpG8fGPldxUEFeVcaf1x</a></td><td></td></tr></tbody></table>

## Step 2: Plan your Deployment

The traffic monitor must be placed with a good view of the roadway. See the [Deployment and Mounting Guide](/deployment-and-mounting-guide.md) for more information on the most common deployment types:&#x20;

1. [Deployment and Mounting Guide](/deployment-and-mounting-guide.md#temporary) deployments allow you to set up on the right-of-way or sidewalk next to a roadway to get counts for a short time.
2. [Deployment and Mounting Guide](/deployment-and-mounting-guide.md#permanent) deployments are geared towards setting up a traffic monitor in a location to get 24/7 counts and monitoring.

## Step 3: Set up your Device

After you have your traffic monitor built, software installed, and physically set up (mounted), it is time to boot it up!  To get the best data and most out of the device, follow these steps:

1. [Setup Guide](/setup-guide.md)
2. [Frigate Config](/configuration/frigate-config.md) will guide you in setting up the object detection capabilities by turning on the camera and detection and defining zones.
3. [Node-RED Config](/configuration/node-red-config.md) will turn on additional data collection capabilities, such as pairing your camera with the radar and other sensors, sharing your de-identified event data with another system or data provider, and more!&#x20;

## Step 4: Collect and Share that Data

The traffic monitor will now run 24/7 collecting the data you set up. It will automatically restart if the power cycles, even if you are not there to reset it.

You can view the on-device dashboards, review event snapshots and clips in Frigate, download the local database, or view data shared with another data provider.

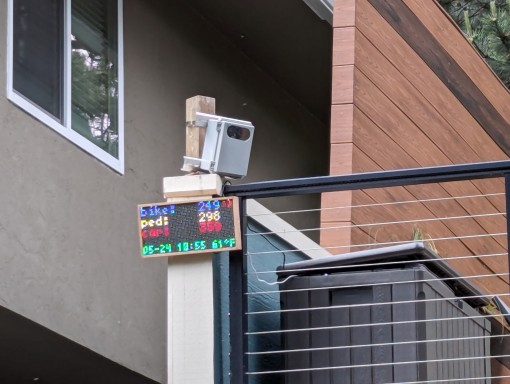
Consider pairing the Traffic Monitor with physical displays to show daily counts of cars, bikes, and pedestrians.  The sky is the limit!  Learn more and share via the [TM GitHub Show and tell](https://github.com/glossyio/traffic-monitor/discussions/new?category=show-and-tell) or our [TM Zulip chat](https://trafficmonitor.zulipchat.com/).

<figure><img src="/files/qLGxPEhyFqqGHsmpqTC9" alt=""><figcaption><p>LED Display showing daily counts capture with the traffic monitor</p></figcaption></figure>


---

# Agent Instructions
This documentation is published with GitBook. GitBook is the documentation platform designed so that both humans and AI agents can read, navigate, and reason over technical content effectively. Learn more at gitbook.com.

## Querying This Documentation
If you need additional information that is not directly available in this page, you can query the documentation dynamically by asking a question.

Perform an HTTP GET request on the current page URL with the `ask` query parameter, and the optional `goal` query parameter:

```
GET https://docs.trafficmonitor.ai/getting-started.md?ask=<question>&goal=<endgoal>
```

`ask` is the immediate question: it should be specific, self-contained, and written in natural language.
`goal` is optional and describes the broader end goal you are ultimately trying to accomplish on behalf of the user. GitBook uses it to tailor the answer towards what is most useful for that goal.

The response will contain a direct answer to the question and relevant excerpts and sources from the documentation.

Use this mechanism when the answer is not explicitly present in the current page, you need clarification or additional context, or you want to retrieve related documentation sections.
